Last Updated: September 26, 2025
Getting Started Connecting Your AI Assistant


Last Updated: September 26, 2025
The HERO AI Connector is actively in beta.
We will be continuing to develop this throughout 2025 to add support for more AI products, including, adding new features for the suite of OperationsHERO products like Events or Inventory.
The main component to how your AI tool will talk with your OperationsHERO account is called an MCP Server.
Think of an MCP Server as a USB cable. One end plugs into your AI tool and the other into OperationsHERO. Now the two can talk to each other and the magic begins.
Setting up this connection will be different for each AI assistant. Use the step-by-step instructions below for the specific AI tool you are trying to connect.
Choose your AI assistant below and jump to the step-by-step instructions

Use the link above or fire up your browser and go to https://claude.ai/
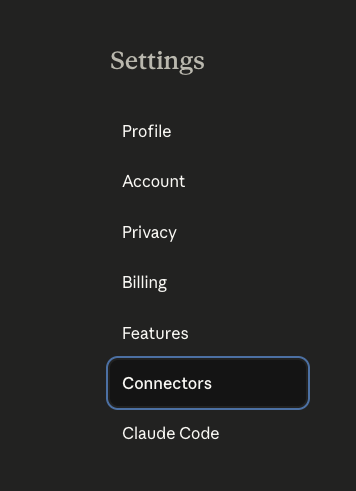
Once you navigate to your settings screen, you’ll see a tab in the left sidebar called Connectors.
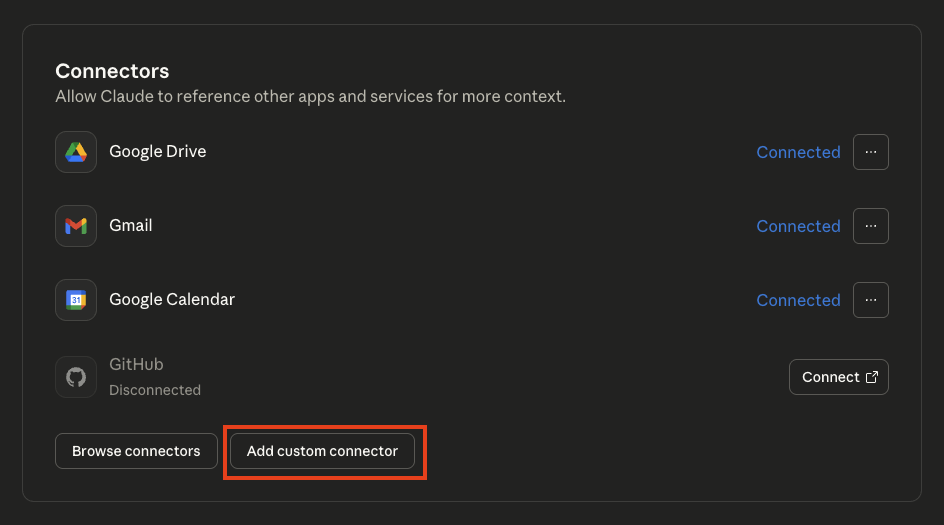
Click on Connectors and you’ll see the screenshot below. Next, you’ll be adding a custom connector to link your OperationsHERO account.
A popup will appear for you to configure your custom connector. Remember this is our USB cable connecting to OperationsHERO.
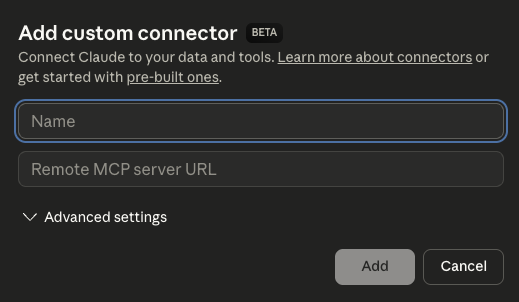
Double check to make sure everything is entered correctly, and click ADD.
Note: You may need to refresh the page if it doesn’t show initially.
To get the connector to launch the OperationsHERO authenticator, you’ll need to disconnect and reconnect. Look at the action buttons to the right of the custom connector, and click the three ellipsis:

Click the Disconnect menu item. You’ll be prompted to confirm that you want to disconnect, and confirm this dialog box.
Now, we are going to reconnect the connector. You’ll see a new action button that says Connect. Click the connect button to launch the authenticator window.

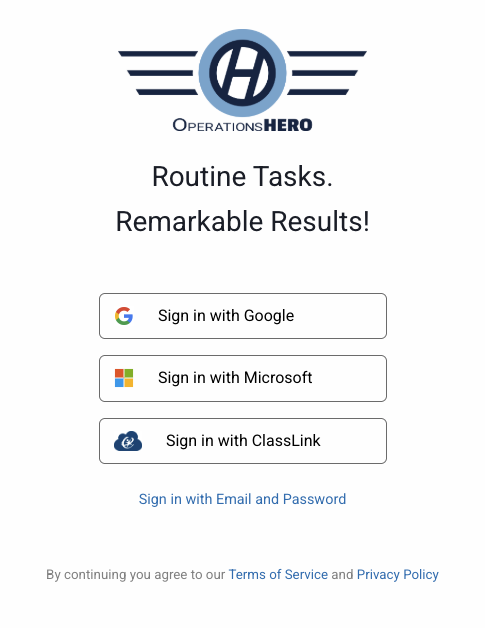
This will prompt you to login to OperationsHERO.
Your assistant is now setup to start working with your OperationsHERO account. We’ve put together some useful prompts to help you get started.
View Chat Prompts →
Currently only available in ChatGPT developer mode
The ability to connect to AI assistants is brand new and AI companies are working to implement connectors rapidly. We expect Team Workspaces and regular personal accounts to be available from OpenAI soon.

Use the link above or fire up your browser and go to https://chatgpt.com
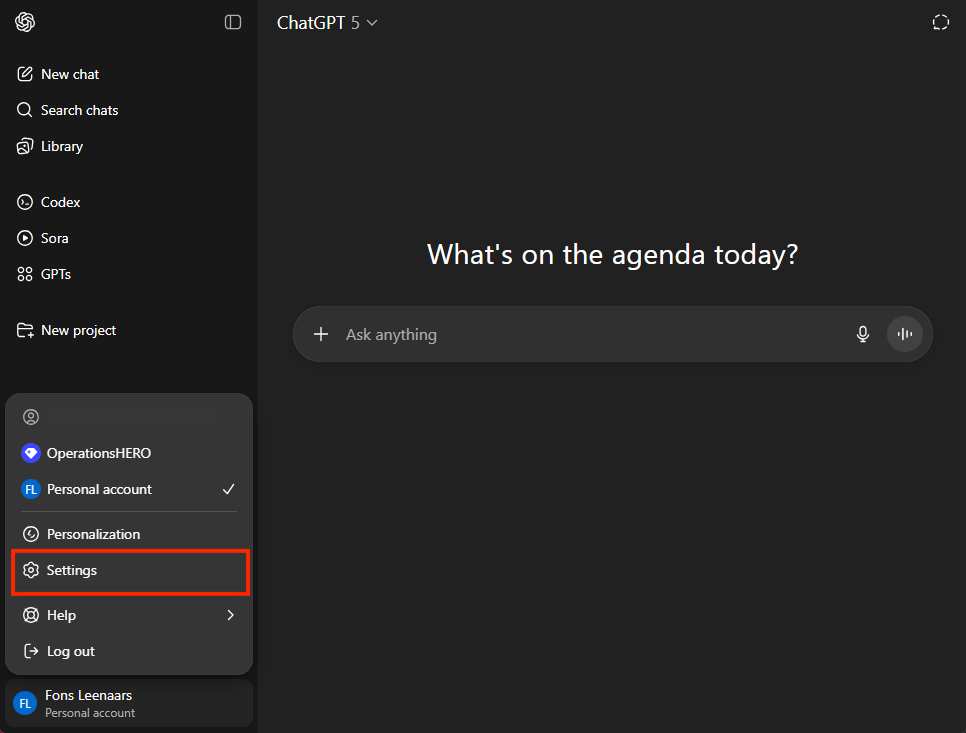
Open your main menu in the bottom left of the browser window by clicking the user icon.
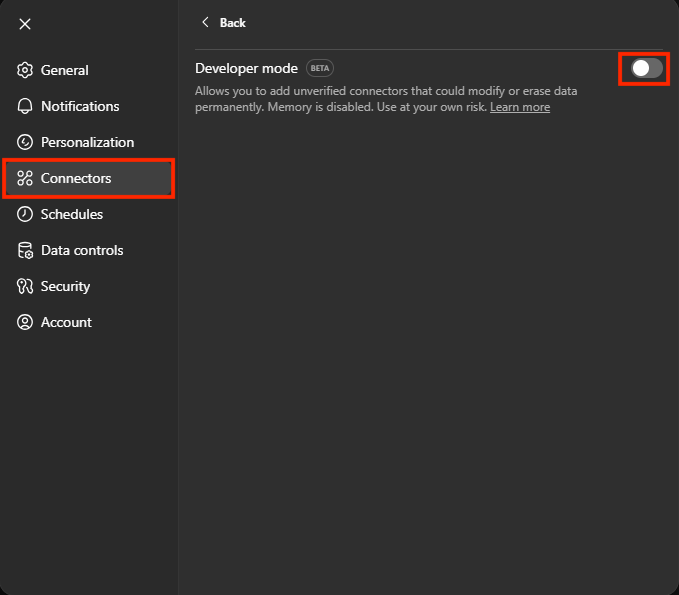
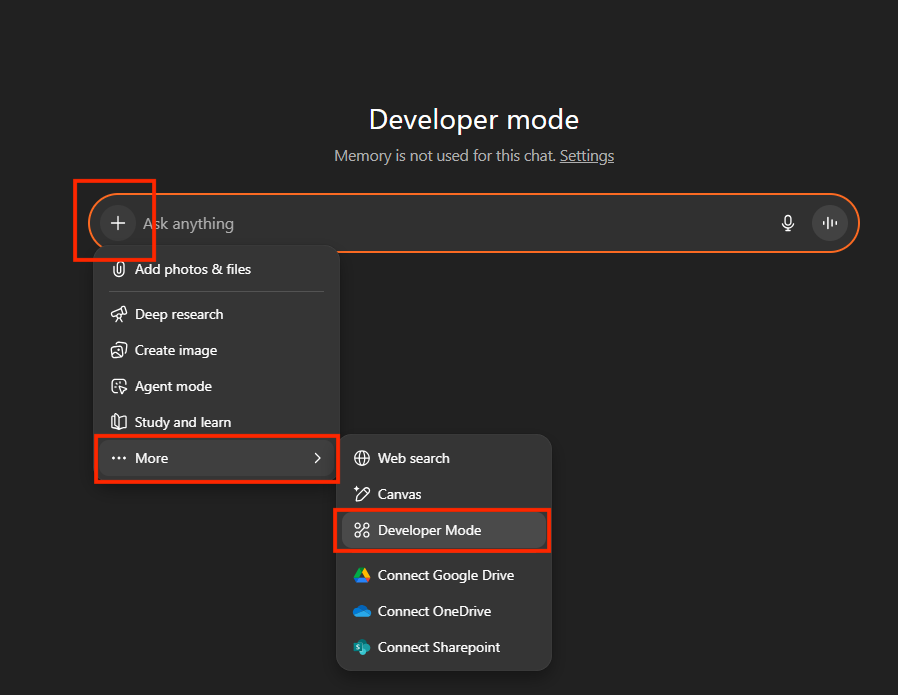
Once you are in your Settings screen, click on the Connectors item in the left side menu. You will see a setting called Developer Mode in the body of the modal. Enable this toggle to turn developer mode on.
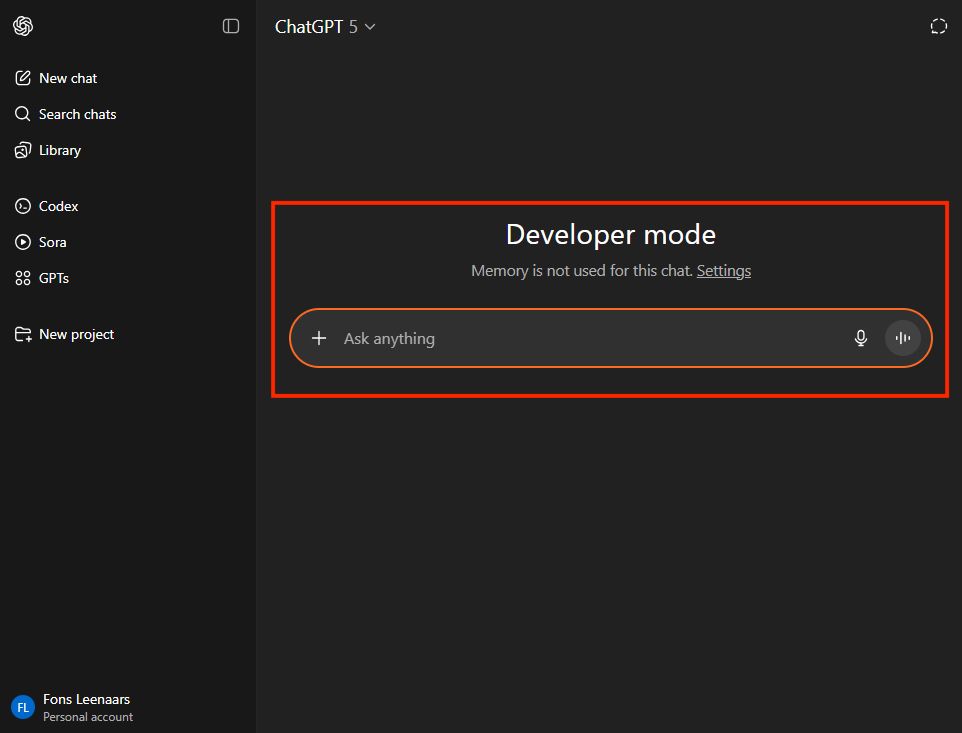
When developer mode is turned on, your chat screen will look like the image below with the orange border around the prompt box.
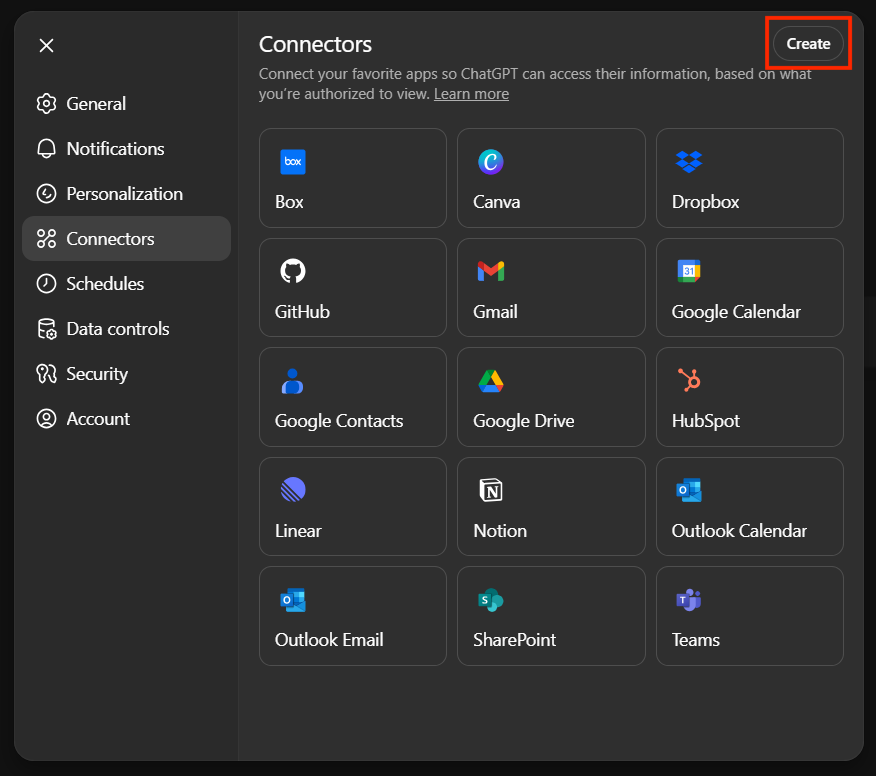
Head back to the Connectors tab of your Settings screen. You will now see a new section that shows available connectors from ChatGPT. In the top right, there is a button to Create a custom connector. Click this button to start configuring the MCP server.
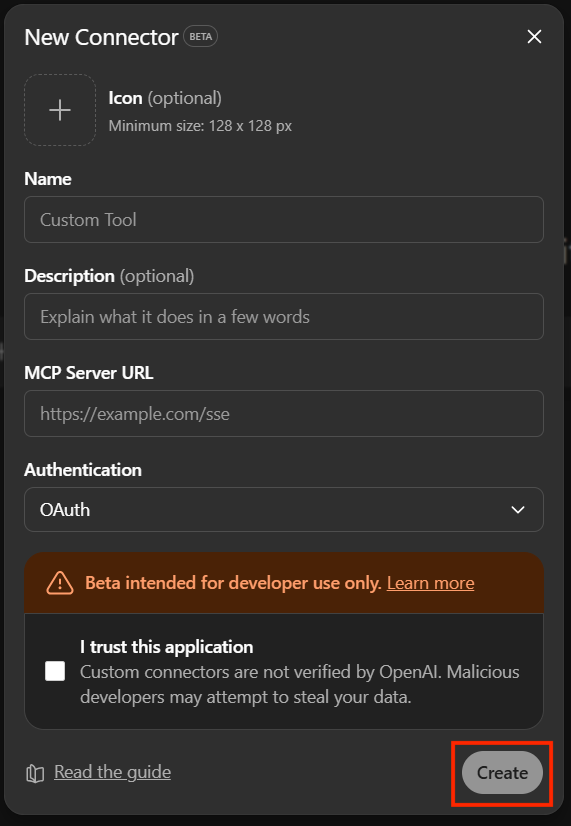
Once you have clicked the create button, you will see a window to configure the connector. Enter the information below for the New Connector fields.
Click the checkbox “I trust this application”
Double check to make sure everything is entered correctly, and click CREATE.
You may be prompted to login to your OperationsHERO account or if you are already logged into Google or Microsoft in your browser, it will automatically authorize.
The last step before you can start using the connector is to turn on a few chat prompt settings.
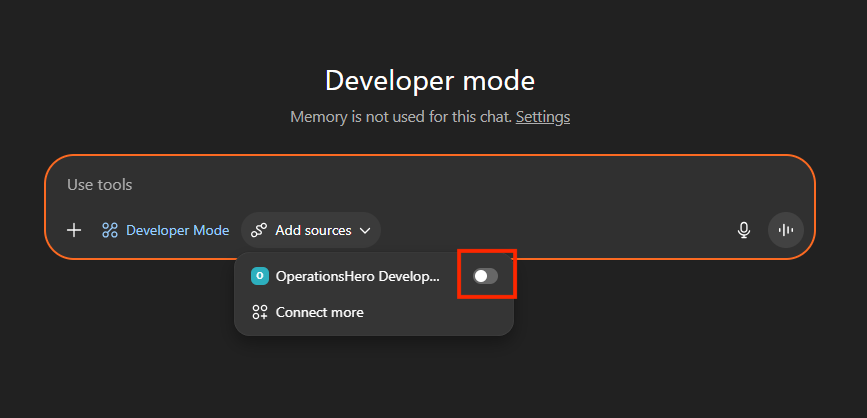
Click the + icon to the left of the chat prompt input and click the More ellipsis. Find Developer Mode and click this option.
Next, you will see another dropdown to Add Sources. Use this dropdown to locate the Operations Hero connector and click the toggle to turn it on.
Developer mode limitations
Your assistant is now setup to start working with your OperationsHERO account. We’ve put together some useful prompts to help you get started.
View Chat Prompts →
Last Updated: September 26, 2025
The HERO AI Connector is actively in beta.
We will be continuing to develop this throughout 2025 to add support for more AI products, including, adding new features for the suite of OperationsHERO products like Events or Inventory.
The main component to how your AI tool will talk with your OperationsHERO account is called an MCP Server.
Think of an MCP Server as a USB cable. One end plugs into your AI tool and the other into OperationsHERO. Now the two can talk to each other and the magic begins.
Setting up this connection will be different for each AI assistant. Use the step-by-step instructions below for the specific AI tool you are trying to connect.
Choose your AI assistant below and jump to the step-by-step instructions
Use the link above or fire up your browser and go to https://claude.ai/
Once you navigate to your settings screen, you’ll see a tab in the left sidebar called Connectors.
Click on Connectors and you’ll see the screenshot below. Next, you’ll be adding a custom connector to link your OperationsHERO account.
A popup will appear for you to configure your custom connector. Remember this is our USB cable connecting to OperationsHERO.
Double check to make sure everything is entered correctly, and click ADD.
Note: You may need to refresh the page if it doesn’t show initially.
To get the connector to launch the OperationsHERO authenticator, you’ll need to disconnect and reconnect. Look at the action buttons to the right of the custom connector, and click the three ellipsis:
Click the Disconnect menu item. You’ll be prompted to confirm that you want to disconnect, and confirm this dialog box.
Now, we are going to reconnect the connector. You’ll see a new action button that says Connect. Click the connect button to launch the authenticator window.
This will prompt you to login to OperationsHERO.
Your assistant is now setup to start working with your OperationsHERO account. We’ve put together some useful prompts to help you get started.
View Chat Prompts →
Currently only available in ChatGPT developer mode
The ability to connect to AI assistants is brand new and AI companies are working to implement connectors rapidly. We expect Team Workspaces and regular personal accounts to be available from OpenAI soon.
Use the link above or fire up your browser and go to https://chatgpt.com
Open your main menu in the bottom left of the browser window by clicking the user icon.
Once you are in your Settings screen, click on the Connectors item in the left side menu. You will see a setting called Developer Mode in the body of the modal. Enable this toggle to turn developer mode on.
When developer mode is turned on, your chat screen will look like the image below with the orange border around the prompt box.
Head back to the Connectors tab of your Settings screen. You will now see a new section that shows available connectors from ChatGPT. In the top right, there is a button to Create a custom connector. Click this button to start configuring the MCP server.
Once you have clicked the create button, you will see a window to configure the connector. Enter the information below for the New Connector fields.
Click the checkbox “I trust this application”
Double check to make sure everything is entered correctly, and click CREATE.
You may be prompted to login to your OperationsHERO account or if you are already logged into Google or Microsoft in your browser, it will automatically authorize.
The last step before you can start using the connector is to turn on a few chat prompt settings.
Click the + icon to the left of the chat prompt input and click the More ellipsis. Find Developer Mode and click this option.
Next, you will see another dropdown to Add Sources. Use this dropdown to locate the Operations Hero connector and click the toggle to turn it on.
Developer mode limitations
Your assistant is now setup to start working with your OperationsHERO account. We’ve put together some useful prompts to help you get started.
View Chat Prompts →